Player Shops
The server has no economy or currency – it is entirely based on player-to-player trading via our server’s trade system. However, the trade system requires both players to be online, and communicate to trade effectively. While the system works well (and it will remain on the server) we wanted to introduce a way for players to automate trade, even if a player is offline, while still maintaining the vanilla feel/limitations. Hence, the player shop system!
The system uses chests to actually have a real physical “supply” for your trades. The person trading with your shop can interact with a villager, but you define what you will trade for what. The system automatically will keep track of the contents of the chest, and disable trades that do not have enough supply. When a user makes a trade – the items they trade go into the chest. You will also be notified that someone has traded with your shop (This can be disabled on a per-shop basis).
The best part about this, is that because the system uses a chest that can be interacted with as normal, you can setup redstone sorters, hopper movers, and more to give your shop plenty of room, or sort the items people trade to your shop. Read about some of the usage below:
- Creating A Shop – Place a chest, point your camera view at the chest, and then use the trade shop command. A villager will appear either on top of, or beside, the chest.
Usage:
/shopkeeper trade [optional entity]NOTE: If you do not define an entity type, it will default to a villager. You can choose villager, illusioner, wandering_trader, witch, or vindicator to be your shopkeeper entity.
- Editing A Shop – Once you have the shop created, you can then shift (crouch) right-click on the villager to open the villager editing menu (click here to see a detailed breakdown of how the shopkeeper editor menu works).
- Listing Your Shops – If you have lost track of your shops, you can easily get a list of where your traders are. Players get
5 tradersby default – and each trader can have1 pageof trades.Usage:
/shopkeeper list - Moving Your Shop Keeper – To move your shop you must break the chest, move it, and then recreate the shop. HOWEVER, You can move the shopkeeper that is attached to your shop, up to
15 blocksaway from the chest it’s using for it’s supply and trades. - Removing Your Shops – If you no longer want one of your shops, you have 2 options:
- Break the chest the shop-trader is attached to – this automatically removes the shop.
- Open the villager menu and click the bone
 icon – this will also remove the shop.
- Important Note – The shopkeeper that is created will be bound to the chest you assign it to. If that chest is destroyed, the shopkeeper will be automatically deleted, and the items in the chest will drop (exactly how a regular chest works). These chests ARE NOT automatically protected. You MUST use the claims system to protect your chests that you assign shops to. Our server has villager trading enabled within user’s claims, so your shopkeeper will still work. This also means that you can
/trustusers in your claim for them to refill or extract items from the shop chest. - Finding Specific Item Trades – If you’re looking to see what shops are available on the server, or to find a specific item that you want to sell or buy, you can use the following commands:
/shops– Use this to see a master list of all the shops on the server, and their locations.
/findshops buying ITEM– Use this command to find shops that are buying a specific item.
/findshops selling ITEM– Use this command to find shops are selling a specific item.
/findshops player PLAYERNAME– Use this command to find shops from a specific player.When searching for an item, you need to use the items official spigot material name (Click here for the page containing the full list).
Within any GUI list of shops, you can left-click any shop and trade with it, without traveling to the physical location.
NOTE: Instead of typing
/findshopsyou can also use/fsas an alias within any of the commands above.
The Shopkeeper Editor Menu
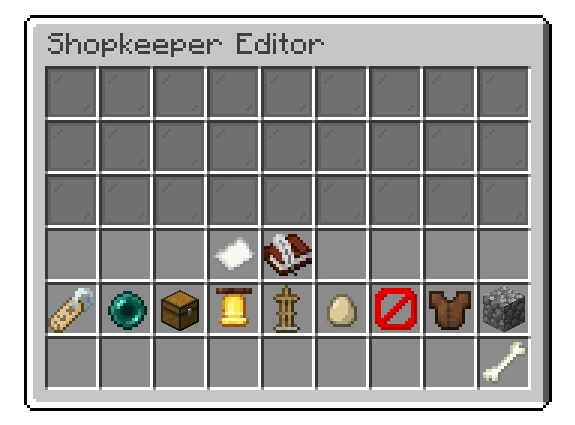
Once you’ve created a shopkeeper you can shift-right-click the villager to open the shop editor menu:

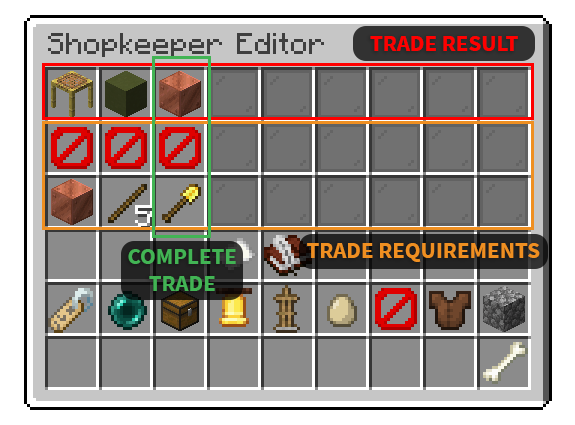
To start, you’ll want to setup some trades for your shopkeeper, here’s how you get a trade setup – the top line of the inventory represents the “result” item, or the item that the player will receive from trading items to the shop. The second and third line represent the items that the user needs to trade in order to receive the “result” from the top line. You don’t have to use both trade lines, but you need to use at least one.
- To place an item inside the trade, you need to have at least ONE of that item in your inventory. Then drag it to a block with a dark glass pane in it. YOU WILL NOT LOSE THE ITEM, it will simply create a copy in the shopkeeper inventory (This also goes for equipment slots).
- You can left-click an item in a trade/result line to increase the item’s “amount” by
1. - You can shift-left-click an item in a trade/result line to increase the item’s “amount” by
10. - You can right-click an item in a trade/result line to decrease the item’s “amount” by
1. - You can right-click an item in a trade/result line to decrease the item’s “amount” by
10. - If the item amount is
1(which won’t show an amount number on the item), you can right-click the item once more to remove it from the inventory entirely.
As an example, let’s say my shopkeeper editor menu looks like the page below:
entity type. Only villagers give you all the available customization options. However – Setting up trades, renaming, and moving your shopkeeper will be the same process regardless of what entity you choose to be your shop’s keeper.
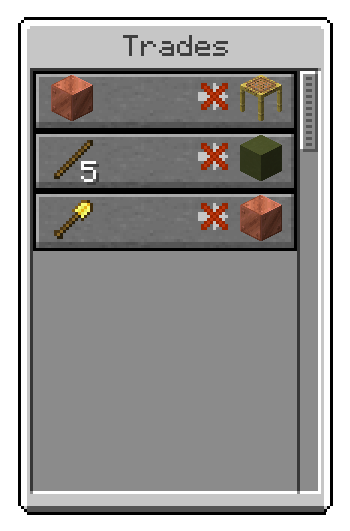
This will result in the follow trades:

Notice how there are “X” markers on the trades, that’s because I didn’t have any of the “results” placed in the chest, and therefore users can’t use those trades until I added the result items into the shop chest. Once you’ve got some trades setup, you can then customize many other aspects of your shop/shopkeeper within the menu – using the items below the trading section:
-
 Nametag Item – Let’s you rename your shop. The name will appear above the shopkeeper when users look at it, and it will show up inside the trade menu when a user interacts with your shopkeeper.
 -
 EnderPearl Item – Clicking this item will close the menu, and let you move your shopkeeper. Right-Click on any block to put your shopkeeper on that block. You can put the shopkeeper up to
 15 blocksaway from it’s chest (Including the chest as a block).
-
 Chest Item – Clicking this item will open the chest inventory that the shopkeeper is bound to. This means you can do convenient things like putting the shop chests underground, and then put the shopkeeper’s above to keep a market place tidy.
 -
 Bell Item – Clicking this item will toggle if you receive notifications in chat when players successfully trade with your shopkeeper (This defaults to
 truewhen you create a shopkeeper). -
 Armor Stand Item – Clicking this item will open the equipment editor for your shopkeeper. You can choose an item to be displayed in their hand, and an optional helmet. This menu works the same as the trade area, drop an item in on an armor stand in the equipment editor menu, and it will “copy” it to the inventory – without taking your item. Right-Click an item to remove it from an equipment slot.
 -
 Bell Item – Clicking this item will toggle if you receive notifications in chat when players successfully trade with your shopkeeper (This defaults to
 truewhen you create a shopkeeper). -
 Egg Item – Clicking this item will toggle if your shopkeeper is an adult, or a baby, variant of the villager.
 -
 Barrier Item – Clicking this item will cycle through the available villager professions – with different items representing each profession type.
 -
 Leather Tunic Item – Clicking this item will cycle your shopkeeper’s variant. The leather tunic will change colors to represent each variant.
 -
 Stone Item – Clicking this item will cycle your shopkeeper’s badge color. The item will change to represent each available color.
 -
 Bone Item – Clicking this item will remove your shopkeeper (The chest will remain unbroken, and the items inside of it).
While this is a lot of documentation, the system is fairly intuitive once you know the commands. Please, feel free to get on the server and try it out. Remember to build your shops within your claims so that they can’t be destroyed! If you think we missed something important in this documentation – please leave a comment and let us know.


This sounds like the best trading system. Rather than an economy which always mucks up the whole server, this lets players trade even if they’re offline. Great idea!
That is the idea. I don’t enjoy currency economies. They take away player made “goals” so to speak.